Protein skimmer gets dirty, real dirty on a regular basis. The amount of workload put on the skimmer force it to be grimy. It continuously runs to keep your aquarium neat and clean for the fishes.
Like many other tools, protein skimmer also needs to be taken care of regularly. Otherwise, you won’t get the best out of it.
Many people don’t understand the importance of keeping the protein skimmer limpid. But the real problem arises when it’s time to cleaning the skimmer as they can’t figure out how to clean up different body parts of the skimmer.
If you are one of them then just sit relax and go through the whole article. Since today I will share the complete process of how to clean a protein skimmer. So let’s get into the business without any further talk.
Process of Cleaning Up The Protein Skimmer
A good quality protein skimmer mainly consists of two parts; the collection cup and the body. For your convenience, I will discuss the cleaning process of both separately.
Cleaning The Collection Cup
Collection cup is the place where all the organic particles, detritus, waste particles, and other dirt accumulate.
Begin the process by opening the output bulb of the protein skimmer. Now carefully remove the collection cup from the skimmer.
After that remove the cap from the collection cup and take it to the sink. Now rinse water over it. Use your hand to clean up dirt that doesn’t wash out after rinsing.
Now that you have cleaned the cap of the collection cup, it’s time to clean the collection cup. Take it to the sink and start rinsing water to it. If it’s dirty you should be happy since it’s proof that your protein skimmer is working perfectly.
If you find dirt that can’t be clean through hand or water, then use a stiff brush to clean them. Make sure that the brush you are using to clean the skimmer doesn’t use in other cases like cleaning dishes or pets.
Now go to the neck section and scour water on it. Then clean it with a stiff brush. It’s important that you clean the skimmer neck perfectly as the cleaner the neck the more efficient it is.
While rinsing water you should make sure that the water is at normal temperature. Hot water may damage the plastic. And if you use cold water then you won’t get the best result. So, normal temperature water is the best option.
Cleaning The Body Of The Protein Skimmer
People usually clean the collection cup on a frequent basis. But the matter of sorrow is they don’t take it seriously when it comes to cleaning the body of the skimmer. That is the major reason behind the low working life and poor performance of a protein skimmer.
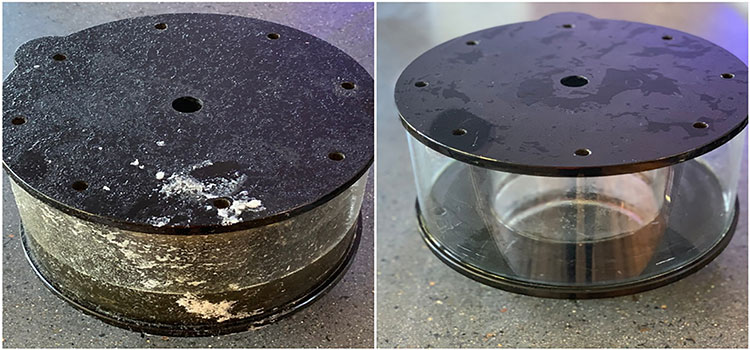
If the skimmer body kept unwashed for a long time then coralline algae, detritions, and calcareous organisms will grow inside, and thus the skimmer will lose its life in a short time.
Like a collection cup, you can’t clean the body simply with water and a stiff brush. You need another ingredient, you got it; its vinegar. Vinegar is cheap and available in all the grocery shops.
To start the cleaning process at first you have to collect a big size bucket. Now put the protein skimmer body inside it. If other instruments need to be cleaned off then you can put them in the bucket too. Make sure that you keep the lid open of the skimmer.
Now put vinegar and water in the bucket until they cover the whole body of the skimmer. The ration of water and vinegar should be 1:1. Now let them soak for one or two days.
After soaking two days the coralline algae and other dirt will loosen up and become easy to be cleaned off. Even the hardest and dirtiest things will be loosened up after soaking.
Now take a brush and insert it in the protein skimmer as your hand cannot reach there. Rub inside the skimmer altogether using a stiff brush. You will see the dirt is getting cleaned very easily.
One great thing about the mixer of the vinegar and water is that you can apply this mixer to other water tanks too.
Now that you have cleaned all the parts of your protein skimmer, they are ready to be reinstalled. Firstly connect the body parts of the skimmer. Then set it on the right places of the aquarium.
Put the cap back on the cup collection of your skimmer. Now reinstall it carefully in its place. Finally dial in the gate valve or output pipe on your skimmer.
That’s all; you are done with the complete cleaning process of your protein skimmer!
Also Read: How a Protein Skimmer Works??
How Often You Should Clean The Skimmer?
Some of us get confused when the question comes; how frequently we should clean the protein skimmer? The answer varies upon your aquarium size and the types of the skimmer.
Usually, I would prefer to clean the collection cup and the neck of the skimmer every day. But if your aquarium is small in size then you can clean them every two days.
When it comes to cleaning the whole body, you should clean it after every three months. It takes time and tedious to dissemble the whole body of the skimmer. But still, you should do it for better functioning of the skimmer. And if the size of your aquarium is very little in size then cleaning the skimmer after every six months is enough.
Concluding Words
A clean protein skimming always performs better than the dirty one. Cleanliness also increases the life span of the protein skimmer.
Apart from that nobody would like it to have terrible smell come from the wastage of the skimmer. It’s detrimental for your fishes in the aquarium too.
Spending a few minutes you can easily clean the collection cup and its neck. Though Whole-body cleaning takes some time and effort, you don’t need to do this on a regular basis.
I hope this article will immensely help you out on how to clean protein skimmer and give the fishes an amazing water environment. Please let me know if you have any queries. Happy aquarium fish firming!
Leave a Reply